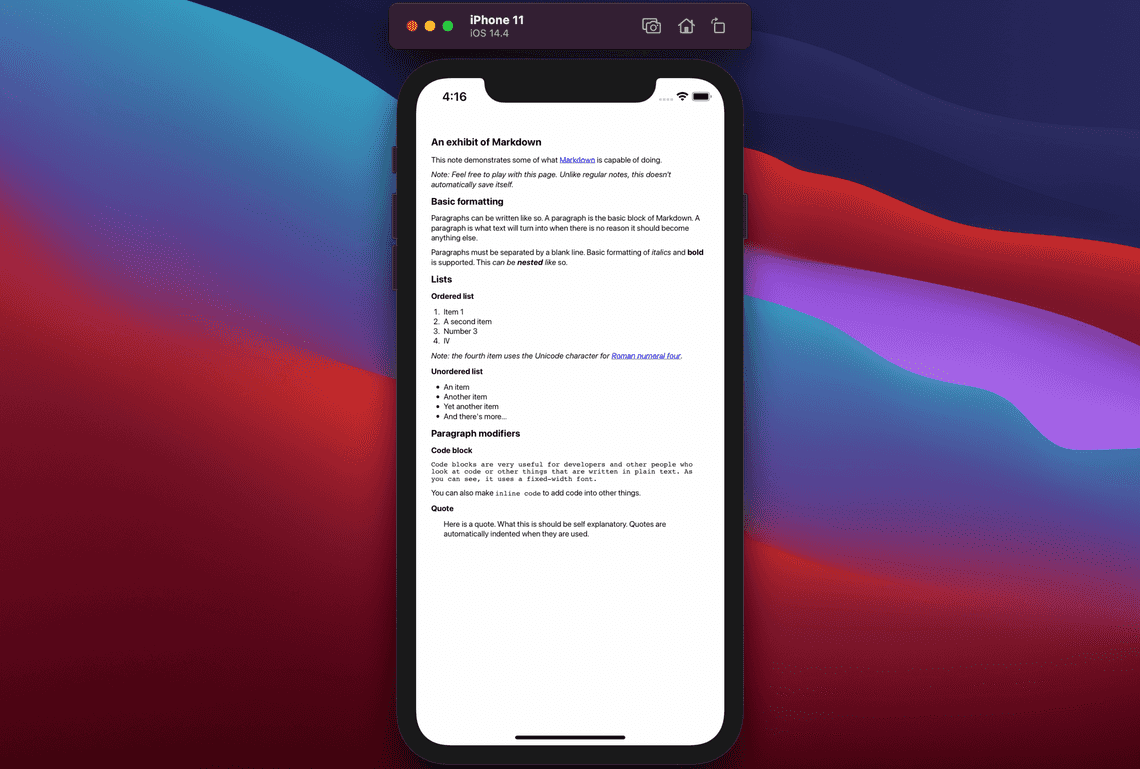
有时你需要将 Markdown 格式的内容并展示在应用程序内。因此,你需要将 Markdown 的内容转换成 HTML 代码并将其显示在 WebView 中。
准备 Makdown 格式的文件
Markdown 是一种轻量级的格式,可以为任何文本设置样式,并且非常易于使用。例如,Github 上的所有 README 都是用 Markdown 编写的。您可以通过这些文件了解 Markdown 语法的更多信息。
首先,我们需要获取 Markdown 文本。我们将使用来自 Github Guides 的示例 Markdown 文本,并将其转换为 HTML 代码。
# An exhibit of Markdown

This note demonstrates some of what [Markdown][1] is capable of doing.

*Note: Feel free to play with this page. Unlike regular notes, this doesn't automatically save itself.*

## Basic formatting

Paragraphs can be written like so. A paragraph is the basic block of Markdown. A paragraph is what text will turn into when there is no reason it should become anything else.

Paragraphs must be separated by a blank line. Basic formatting of *italics* and **bold** is supported. This *can be **nested** like* so.

## Lists

### Ordered list

1. Item 1
2. A second item
3. Number 3
4. Ⅳ

*Note: the fourth item uses the Unicode character for [Roman numeral four][2].*

### Unordered list

* An item
* Another item
* Yet another item
* And there's more...

## Paragraph modifiers

### Code block

    `Code blocks are very useful for developers and other people who look at code or other things that are written in plain text. As you can see, it uses a fixed-width font.`

You can also make `inline code` to add code into other things.

### Quote

> Here is a quote. What this is should be self explanatory. Quotes are automatically indented when they are used.
将 Makdown 转成 HTML 格式
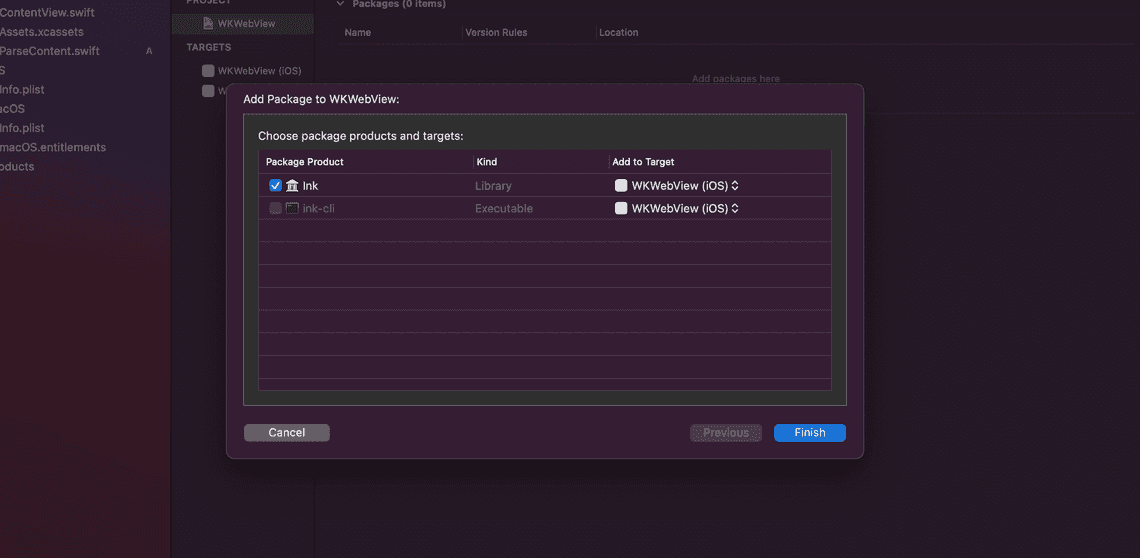
要将 Markdown 文本转换为 HTML,我们需要使用一个名为 Ink 的包,它是一个用 Swift 编写的包,可以实现此功能。让我们使用 Swift 包管理器 ,添加 Github 库链接 (https://github.com/JohnSundell/Ink) 添加此包。

接下来,让我们创建一个名为 ParseContent.swift 的新文件,首先在文件顶部导入 Ink 库。
// ParseContent.swift
import Ink
创建一个 ParseContent 类。
// ParseContent.swift
class ParseContent {

}
在该类中,让我们将 Markdown 文本保存到多行字符串变量中。
// ParseContent.swift
var markdown = """
# An exhibit of Markdown

This note demonstrates some of what [Markdown][1] is capable of doing.

*Note: Feel free to play with this page. Unlike regular notes, this doesn't automatically save itself.*

## Basic formatting

Paragraphs can be written like so. A paragraph is the basic block of Markdown. A paragraph is what text will turn into when there is no reason it should become anything else.

Paragraphs must be separated by a blank line. Basic formatting of *italics* and **bold** is supported. This *can be **nested** like* so.

## Lists

### Ordered list

1. Item 1
2. A second item
3. Number 3
4. Ⅳ

*Note: the fourth item uses the Unicode character for [Roman numeral four][2].*

### Unordered list

* An item
* Another item
* Yet another item
* And there's more...

## Paragraph modifiers

### Code block

    `Code blocks are very useful for developers and other people who look at code or other things that are written in plain text. As you can see, it uses a fixed-width font.`

You can also make `inline code` to add code into other things.

### Quote

> Here is a quote. What this is should be self explanatory. Quotes are automatically indented when they are used.
"""
然后,让我们使用 Ink 包将 Markdown 转换为 HTML。
// ParseContent.swift
let parser = MarkdownParser()
let html = parser.html(from: markdown)
创建 WebView
创建一个名为 WebView.swift 的新文件,该文件将采用以下 WebView 结构:
import SwiftUI
import WebKit

struct WebView : UIViewRepresentable {
    var html: String

    func makeUIView(context: Context) -> WKWebView  {
        return WKWebView()
    }

    func updateUIView(_ webView: WKWebView, context: Context) {
        webView.loadHTMLString(html, baseURL:  nil)
    }

}
接下来,你需要调用 WebView 在 ContentView 文件里,向其传入处理好的HTML 内容
// ContentView.swift

@State var htmlContent: String = ""

var body: some View {
        WebView(html: htmlContent)
                .onAppear() {
                        htmlContent = ParseContent().parse()
                }
}

为您的 WebView 添加一些样式
WebView 的默认呈现样式并不能满足我们的需求,因此我们需要添加一些个性化的字体样式需求,接下来回到 ParseContent.swift 文件,我们来添加一些个性化的样式,在 parse() 方法里,我们在内容的外部嵌套了一层 DIV 容器样式,我们可以添加一些个性化的样式,示例代码如下:
func parse() -> String {
        let parser = MarkdownParser()
        let html = parser.html(from: markdown)

        let htmlStart = "<div style=\"padding: 40px; font-family: -apple-system,BlinkMacSystemFont,Segoe UI,Roboto,Oxygen,Ubuntu,Cantarell,Open Sans,Helvetica Neue,sans-serif\">"
        let htmlEnd = "</div>"

        return htmlStart + html + htmlEnd
}
除此设置字体的样式,我们还可以针对特殊的 HTML 标签定义个性化的样式,比如 H1 标签,我们可以通过正则匹配的方式,定义个性化的样式标签。
let titleRegex: String = "<h1.*?"
let titleContent = html.replacingOccurrences(of: titleRegex, with: "$0" + " style=\"color: blue; font-size: 40px", options: .regularExpression, range: nil)
版权声明
注:本文属于原创文章,版权属于「前端达人」公众号及 SwiftUI.cc 所有,谢绝一切形式的转载
更多精彩内容,请关注「前端达人」


