
大家好,本篇文章我们将使用 SwiftUI 创建一个简单的天气预报应用。本案例从SwiftUI的初始化项目开始创建,本案例将会使用动态请求接口的方式获取天气数据,并根据用户的手机定位获取天气信息。好吧,我们开始动手来实践吧。
概述
首先我们使用 Apple 的 CoreLocation 框架获取用户的当前位置坐标。接下来,我们将学习如何使用坐标通过免费的天气 API OpenWeather 获取当前天气信息。最后,我们将通过以下漂亮的 UI 中展示我们获取的所有数据。
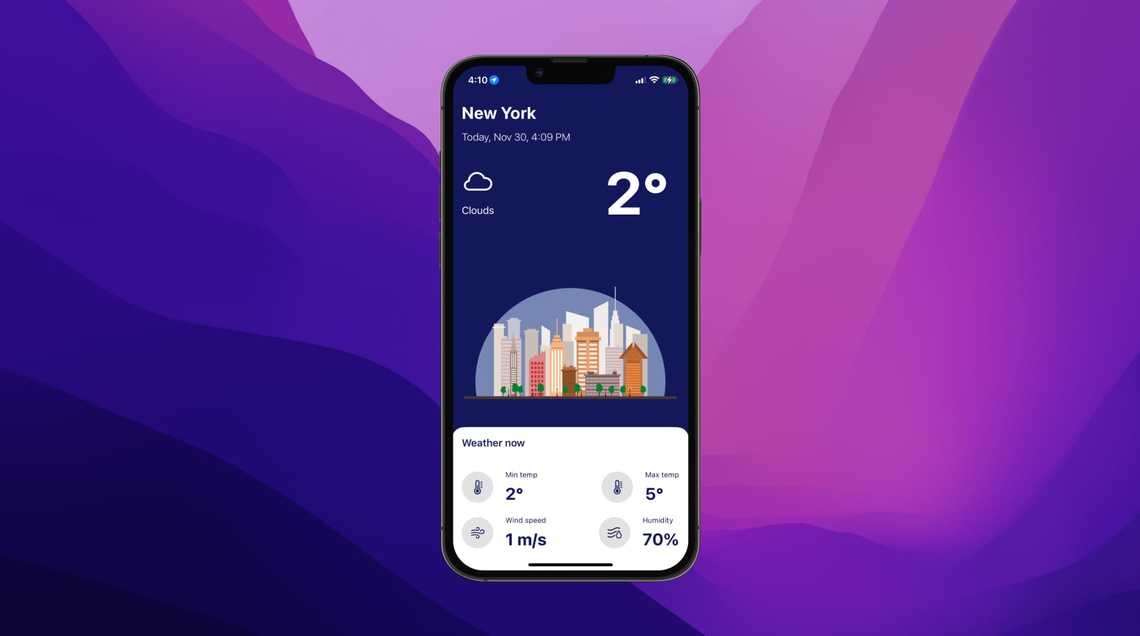
项目准备
由于我们将使用 SwiftUI 构建移动应用程序,因此您需要确保在 Mac 上安装了 Xcode 13 或更高版本,以及运行 iOS 15 系统的 iPhone 或 iPad 进行测试。您可能已经猜到了,我们将使用 iOS 15 中引入的最新 API 和技术,因此请确保将 Xcode 和您的手机更新到最新版本。此外,由于我们需要用户的位置,我们无法在模拟器上进行测试,需要在实际设备上进行测试。现在,我们马上开始动手实践吧!
创建 XCODE 项目
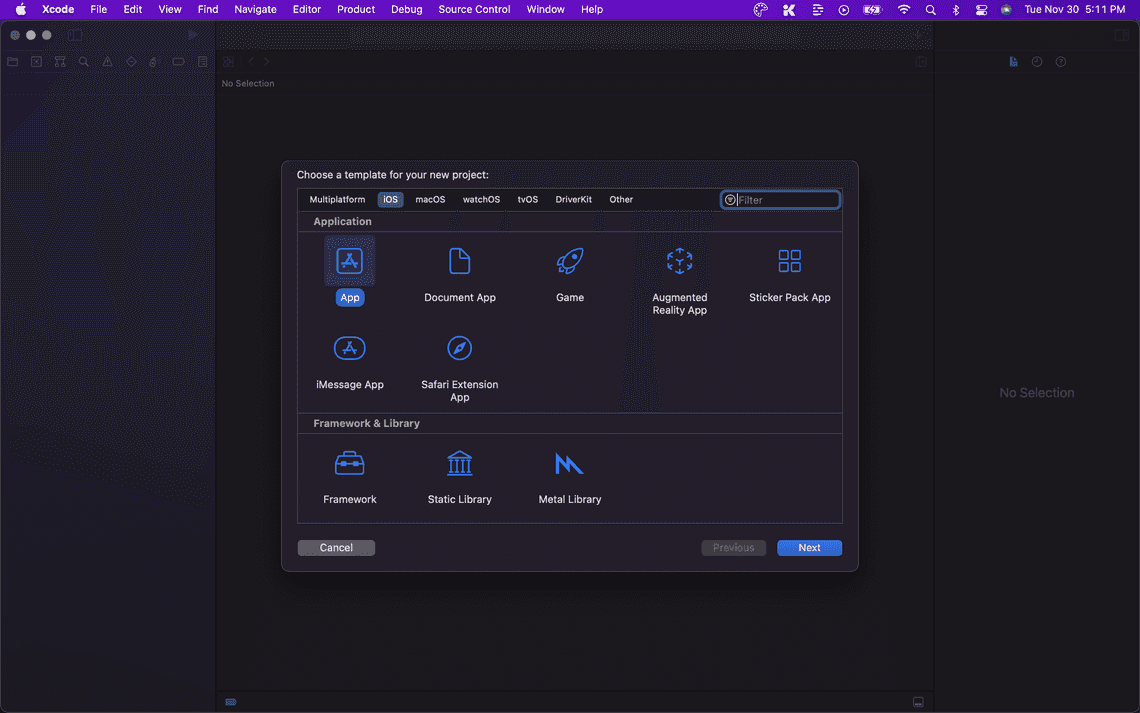
首先,让我们创建一个新的 Xcode 项目。点击 Xcode 应用图标,单击 Create a new Xcode project ,接下来,在 iOS 选项菜单下,选择 App 。单击下一步。
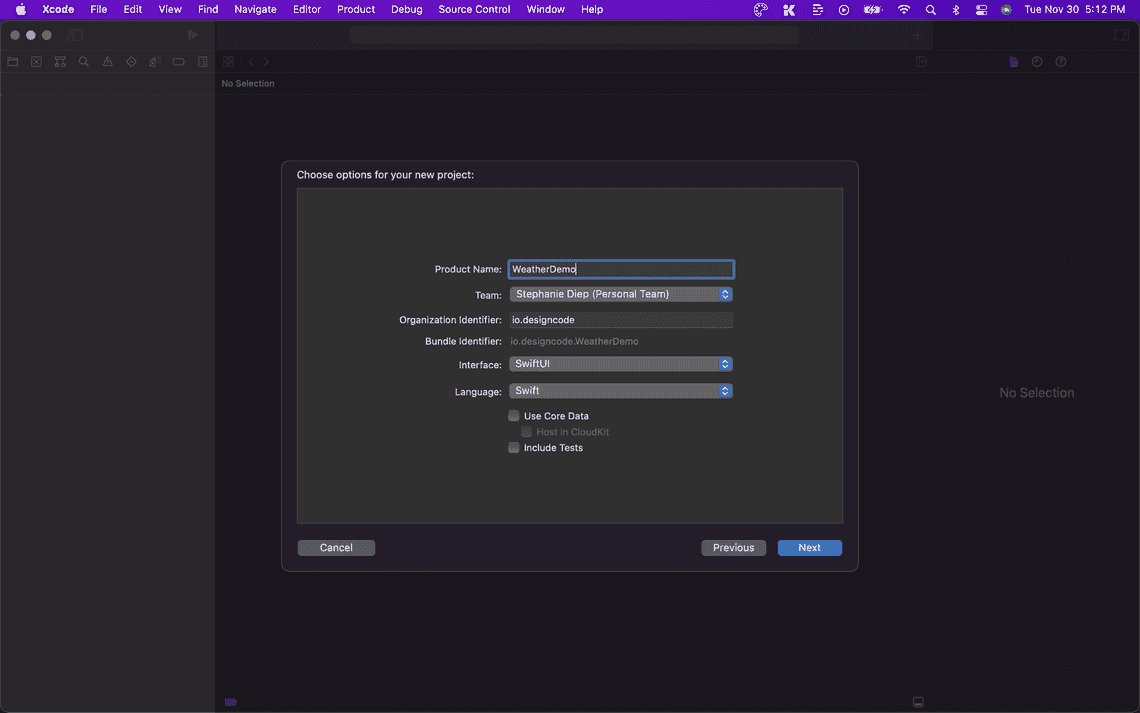
为您的项目命名。确保 Interface 是 SwiftUI 并且 Language 设置为 Swift 。通常,这些是默认值,因此您无需更改任何内容。
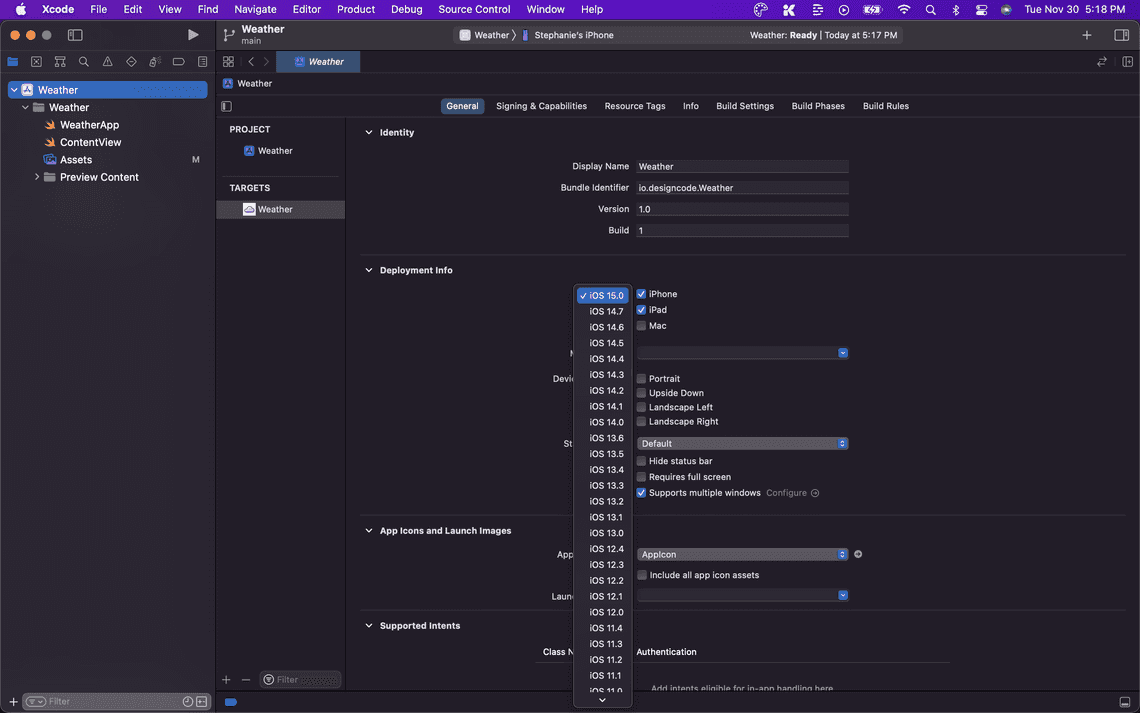
然后,我们需要确保只针对 iOS 15 或更高版本的设备。换句话说,只有在 iOS 15 上运行的设备才能下载和使用此应用程序。单击您的项目名称,然后在 Targets 下,再次单击您的项目名称。在 General 选项卡 > Deployment Info 下,选择 iOS 15。
接下来我们可以继续导入应用相关的图标,你可以通过文末的资源链接,找到对应的图标资源。
![]()
创建 LocationManager 文件
项目的基础配置工作已经完成,我们需要创建一个 LocationManager 。这将是我们将在其中处理与位置相关的所有内容的文件。接下来创建一个名为 Managers 的文件夹。在其中,添加一个名为 LocationManager.swift 的新 Swift 文件,如下图所示
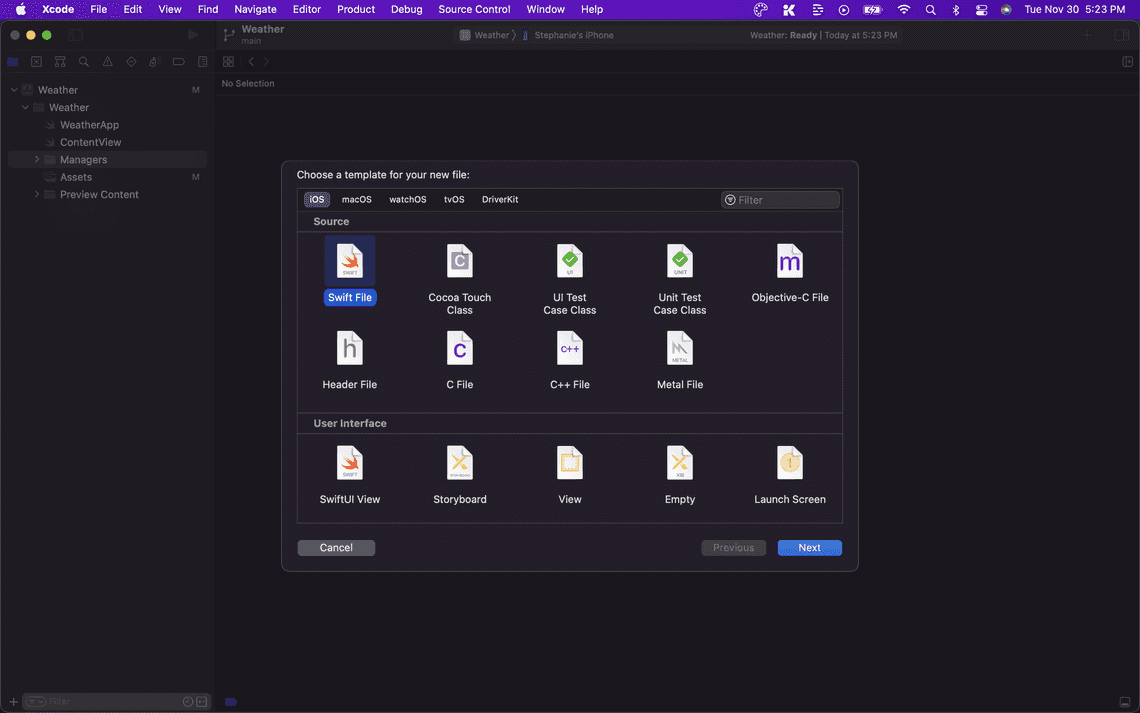
在文件的顶部,我们需要引入 Foundation 和 CoreLocation 类。CoreLocation 是 Apple 的框架,我们将使用它来获取用户的当前位置。
// ./Managers/LocationManager.swift

import Foundation
import CoreLocation
接下来,让我们创建 LocationManager 类。让其继承 NSObject、ObservableObject 和 CLLocationManagerDelegate。
// ./Managers/LocationManager.swift

class LocationManager: NSObject, ObservableObject, CLLocationManagerDelegate {

}
在类的顶部,添加一个 manager 变量。实例化一个 CLLocationManager 实例。
// ./Managers/LocationManager.swift

class LocationManager: NSObject, ObservableObject, CLLocationManagerDelegate {
    let manager = CLLocationManager()
}
在此之下,我们将添加两个公有变量——一个位置和一个加载状态。
// ./Managers/LocationManager.swift

class LocationManager: NSObject, ObservableObject, CLLocationManagerDelegate {
    let manager = CLLocationManager()

    @Published var location: CLLocationCoordinate2D?
    @Published var isLoading = false
}
最后,将以下函数添加到类中。这些函数会让我们获取用户当前的位置坐标,并更新加载状态
// ./Managers/LocationManager.swift

class LocationManager: NSObject, ObservableObject, CLLocationManagerDelegate {
        // Variables here...

    override init() {
        super.init()
        manager.delegate = self
    }

    func requestLocation() {
        isLoading = true
        manager.requestLocation()
    }

    func locationManager(_ manager: CLLocationManager, didUpdateLocations locations: [CLLocation]) {
        location = locations.first?.coordinate
        isLoading = false
    }

    func locationManager(_ manager: CLLocationManager, didFailWithError error: Error) {
        print("Error getting location", error)
        isLoading = false
    }
}
注:出于让教程简单的目的,我们将要求用户在每次启动应用程序时分享他们的位置。当然,这不是最好的用户体验,但我们希望本教程保持简单。您可以更进一步,通过阅读 Apple 关于该主题的文(Apple’s documentation),始终在后台获取当前位置。
获取坐标
首先,我们回到 ContentView 文件,我们将添加一些视图用于展示数据,接下来我们创建一个 Views 的文件夹,将 ContentView 拖拽到这个文件夹里,在文件里定义一个 @StateObject 类型的变量 locationManager ,示例代码如下
// ./Views/ContentView.swift

@StateObject var locationManager = LocationManager()
接下来我们在 Views 文件夹下创建一个新视图文件 WelcomeView.swift,我们将在其中请求用户获取他们的位置。在视图的顶部,在 struct 内部,我们将 LocationManager 定义为环境对象。
// ./Views/WelcomeView.swift

@EnvironmentObject var locationManager: LocationManager
让我们在 ContentView 的 body 区域调用 WelcomeView。请记住将 environmentObject 修饰符添加到 WelcomeView 以免以后发生崩溃。我们还将它包装在 VStack 布局中,并将背景设置为深蓝色,将主题设置为深色。
// ./Views/ContentView.swift

VStack {
        WelcomeView()
                .environmentObject(locationManager)
}
.background(Color(hue: 0.656, saturation: 0.787, brightness: 0.354))
.preferredColorScheme(.dark)
现在,让我们继续编写 WelcomeView 的代码。这将是一个带有标题、副标题和按钮的简单视图。示例代码如下所示:
// ./Views/WelcomeView.swift

VStack {
    VStack(spacing: 20) {
        Text("Welcome to the Weather App")
            .bold()
            .font(.title)

        Text("Please share your current location to get the weather in your area")
            .padding()
    }
    .multilineTextAlignment(.center)
    .padding()

}
.frame(maxWidth: .infinity, maxHeight: .infinity)
接下来,我们将在文本下方添加一个 LocationButton。 LocationButton 是自 iOS 15 以来引入的一个新类型按钮,可让我们轻松请求用户的位置。我们将使用一些 cornerRadius 设置按钮的样式,并添加一个白色的前景颜色。
// ./Views/WelcomeView.swift

VStack {
    // Text here...

        LocationButton(.shareCurrentLocation) {
                locationManager.requestLocation()
        }
        .cornerRadius(30)
        .symbolVariant(.fill)
        .foregroundColor(.white)
}
.frame(maxWidth: .infinity, maxHeight: .infinity)
您可能会遇到 Xcode 在范围内找不到 LocationButton 的错误,这时需要在 WelcomeView 引入 CoreLocationUI。
// ./Views/WelcomeView.swift

import CoreLocationUI
回到 ContentView ,让我们显示用户的坐标,看看我们的代码是否有效。如果我们看一下 LocationManager ,您会发现我们将位置保存在我们已经定义的公有变量 location。我们可以在 View 中使用 locationManager.location 访问它。因为其包含一些属性,需要通过 . 的语法进行访问。
// ./Views/ContentView.swift

if let location = locationManager.location {
    Text("Your coordinates are: \(location.longitude), \(location,latitude)")
}
在 ContentView 中我们仍需要加个判断语句,当未获取到用户本地状态时,有一个加载提示。
else {
        if locationManager.isLoading {
                ProgressView()
        } else {
                WelcomeView()
                        .environmentObject(locationManager)
        }
}
结束语
现在将您的设备连接到您的 Mac,在您的设备上构建并运行该应用程序,然后查看您的视图中是否显示了经度和纬度。运行成功后,我们现在可以使用这些坐标获取天气。否则,向上滚动以查看您是否错过了步骤或忘记在代码中添加某些内容。接下来,我们将通过接口的形式获取天气信息!
版权声明
注:本文属于原创文章,版权属于「前端达人」公众号及 SwiftUI.cc 所有,谢绝一切形式的转载
更多精彩内容,请关注「前端达人」


